

Lift Station for Water Drainage Problems Using Commercial Sump Pump Basin
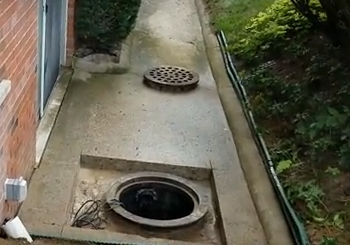 We just put in a lift station and I just want to explain how this repair worked. This was a drain that would catch all the water. This is an apartment complex and this happens to be their handicap unit. So, there’s the ramp. All the water comes down this ramp and there used to be a drain right there that we removed. We cut the concrete out, the drain, quit working, and this unit has flooded since five times.
What we did is we cut the concrete out, remove the drain. The drain just went to the footer tile, so we followed it, we dug and we followed it underneath the concrete and that’s all it was just tied into the footer tile and the footer tiles plugged was sand.
The reason why the foot or tiles plugged with sand, look at this. If you don’t, if you have really good, you know, soil or sediment, soil, sandy soil, and you don’t have a burrito wrap on your footer tile. I see these guys doing it all the time. They put their videos up on YouTube and I’d be embarrassed. Everything has to be wrapped in geotextile drainage fabric.
This here was a failure that would cost tens of thousands of dollars to repair. Instead of digging up all this earth along this building, busting out the concrete, the concrete walk, the landscape, everything. Tens of thousands of dollars to do this repair. Instead of doing that, we just cut out the drain and we put in a lift station. So, this won’t be a solid cover, it’s going to be a grate. We put the cement around here. It’s going to be angled downward, somewhat like a funnel, so all the water goes into this five and a half foot deep, sump crock basin, and it’s basically a lift station. When it fills up. When the float on the pump, there’s a tether float on this and we adjusted it to the height that we want it to start pumping water. Once there’s enough water in this, it’s going to inject the water.
I love what the crew has done here. We discuss all of these. Some systems before we get to the site. Every one is different. There was already this gutter here and we wanted to run the discharge to where it was clean, neat and it was just inconspicuous.
All the roof runoff water is just running in the parking lot to a drain in the parking lot, so we decided let’s go get a piece of a gutter downspout and some straps and let’s just do a nice clean run like this. Then we the discharge line in PVC schedule 40 raceways. It’s in the event that we ever have to service it or or pull this line out and put in a new line, we can do that. We have another raceway right here, which all the cords come from the pump. We had a court from the pump and a cord from the tether floats, it turns the pump on either switch and they had their electrician put an outdoor plug here for us. We explained to them what we needed and they were able to do that for us, which is fantastic.
So, when you go five and a half feet deep, that prevents it from freezing up. You’re going to lose heat even though your deep enough to get ground heat, you’re going to lose heat with one of these covers. So you definitely want to always go, you know, you want to make sure you’re at that five, six foot depth. You’re shooting for it, you know, we’re right there. Five and a half feet deep is where we ended up. And even though we’re going to lose heat through this open, grate, we’re deep enough to keep this pit from freezing.
If it was a solid cover. You can get away and go a little shallower. A lot of our, we have some, some 48 inch systems in with sally covers over them. But as a rule of thumb, we’re always shooting for five, six feet anyways.
For outdoor drainage of all types and for specialty drain systems, yard drain systems, commercial or residential in Southeastern Michigan, give us a call at 248-505-3065.
For more tips, tricks, and information on French Drain / Yard Drainage Systems subscribe to the French Drain Man YouTube Channel.